For example, optical breadboards (e.g., ThorLabs), fiducial markers (e.g., AprilTags), custom printed or machined bases.
What has worked well, what has been more difficult, and what are some tips and tricks you have to share? Any specific examples?
For example, optical breadboards (e.g., ThorLabs), fiducial markers (e.g., AprilTags), custom printed or machined bases.
What has worked well, what has been more difficult, and what are some tips and tricks you have to share? Any specific examples?
As a chemist new to making things, I have been using the optical breadboard from Thorlabs because it provides mechanical support for fixed arms and precise positioning for repetitive workflows.
I am also open to vision-guided systems because they allow more flexible workflows and straightforward calibration.
I wonder if there is any work comparing them.
For our (UBC-Ada) solid dosing platform, we waterjet-cut custom aluminum mounting plates for all our instruments and secured them to aluminum extrusion as our deck. For a large deck (1m x 1m) this is a more affordable option than an optical breadboard/tooling plate, but it only works as long as things are secured and someone doesn’t reposition the plates. Since it is on extrusion, this is not great for instruments that need to be removed and replaced regularly as you cannot guarantee you’ll put the plate back in the right position (though, you can mitigate this by designing hardstops, visual markers, etc.). But it does give the advantage of fine-tuning the position of your instruments if you need to.
For our system we never really have to replace the plates, and even if we need to service the instrument we can usually remove it while leaving the plate fixed on the deck. And to make sure we know that nothing has shifted, we marked each bolt with bolt marker (this also helps us see if vibrations are causing screws to get loose).
We have used tooling plates like the one on the North Robotics N9 and those are great (except that they powder coated the plate after they tapped it, so we had to retap all the holes…). We couldn’t justify the cost for such a large area though. However, we did space our extrusion so that we could purchase Vention’s tooling plates if we wanted to have it in particular areas on the deck in the future.
@yangcyril.cao and @dlin, any links or images to specific parts or design files you could share? In particular, I’m thinking of the Thorlabs breadboard and the N9 tooling plate. Curious also to get a sense of the cost.
Sorry, didn’t get around to responding to this one - here’s a picture of one of the mounting solutions we use for our solid/liquid dosing module. We have Vention extrusions running along the bottom and waterjet-cut (or 3D printed) adapter plates for the equipment. We wanted the flexibility of extrusion/slots to be able to easily reposition our instruments since we hadn’t fully finalized the positions in the enclosure, so to mitigate the risk of undetectable tampering we used bolt marker (the yellow stuff). I actually noticed today on another piece of equipment that some screws had come loose from vibrations because the bolt marker was broken, so that was a really helpful detection tool.
I’ll have to clear it with admin before I can share any CAD files, though Owen in SDL4 may have the same (or updated) CAD file of the N9 tooling plate. It’s just an array of M4 threaded holes spaced 37.5mm apart anyway, which is easy to model.
We actually don’t use Thorlabs breadboards, nor the Vention tooling plate because they’re usually quite expensive. We haven’t done it ourselves yet, but I think it ends up being cheaper to design our own and get it made by a machine shop (or a bored co-op). I believe the Hein lab is doing this approach for their tabletops. An added benefit is that you can design your own standard spacing/hole size for your lab in case the ones off the shelf aren’t quite right for the scale of your SDL.
Doesn’t allow me to upload a step/stl file, but for reference, this was a 2x2ft plate, 1/2" thick HDPE. The cost from the school’s machine shop was $185, but this is without any mounting holes so that probably adds a bit more to it.
SDL1-0005-bottom-shelf-RevA- 202501151632.pdf (268.9 KB)
This may be expanding the scope of this thread a bit, but when it comes to fixing central robot arms on the floor, I highly recommend bolting it directly to the floor if possible. If not, at least use levelling casters that cannot easily be moved or adjusted.
We used to have our UR5e on feet that had a lever to engage wheels. The lever made it TOO easy to engage the wheels. Because of our tight workspace, people walking by would sometimes accidentally kick the lever and engage the wheels. Even though we’d disengage it afterwards, the robot positions would be completely off and we’d have to redo all the movements - this happened many, many times.
In our new lab, we decided to bolt the entire robot to the floor and had building ops install floor anchors that we could secure things to. Not quite necessary for all of our equipment, but certainly necessary for the central robot that has a lot of positions that would need to be reconfigured if moved.
Good wheels:
Bad wheels:
A nice example of AprilTags that I came across:
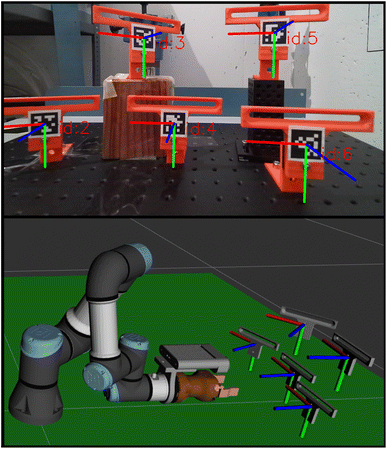
We used computer vision and fiducial makers for pose estimation of the sample holder. … The fiducial markers were from the marker family DICT_APRILTAG_36h11 in the ArUco class of markers, and were affixed to a common relative location on all samples, and printed to at 26.65 cm in width and height.
Fig. 6 Pose detection live. The robot views the sample library and dynamically detects the sample data and coordinate reference frames for the sample holders (top). This information can be added to the RViz visualization (bottom).
Xref: Is there a place I can buy a large set of AprilTags of various sizes?